|
|
|
Who's Online
There currently are 6016 guests online. |
|
Categories
|
|
Information
|
|
Featured Product
|
|
|
 |
|
|
There are currently no product reviews.
 ;
The AKAI 1720 model reel to reel tape recorder described in this Manual is quite an old unit - circa late 1960's. As a consequence, the description of the mechanical details - and adjustments thereof - is quite critical. The manual does this quite well. The schematics are also well presented and have detailed PCB overlays. Probably the only negative is that some half-tone detail has been lost from the original manual as it has been scanned in simple B&W.
 ;
Perfect source for service manuals: fast and professional transaction; high quality, perfect readable and largely scaleable PDF; complete schemes, diagrams and spare part list. Tnx a lot, cu again!!!!
;
I got your link from a friend and I must say that I am really satisfied with your service. Specially this B&O manual I didn't find anywhere on the web... but you could deliver it :-) . You deliver very fast and the copy is of good quality. So your webpage is bookmarked. Thanks
;
This was the Sony CCU-500A Service manual I was looking for.
The price was reasonable.
The permission to download was quck.
I will use Owner-Manual.com for all my manual needs.
;
Excellent printing quality.
A complete and very usefull service manual with all details.
GREAT SERVICE AT VERY LOW PRICE!
A+++++++++++++++++++++++++
DLV-100
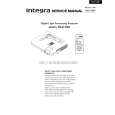
Remote Control Features
1. Infrared Transmitter Direct the remote control toward the remote sensor on the projector cabinet. 2. Standby/On Button If the main power is applied, you can use this button to turn your projector on or put it in standby.
Supplied Remote Control
1
5
3. S-Video Button Press this button to select an S-Video source from a VCR. 4. Video Button Press this button to select an NTSC, PAL, SECAM or NTSC4.43 compatible video source from a VCR, DVD player, laser disc player or document camera. 5. RGB Button Press this button to select a video source from computer or component equipment connected to your RGB port. 6. Auto Adjust Button Use this button to adjust an RGB source for an optimal picture. Some signals may not be displayed correctly or take time to switch between sources. 7. Magnify + - Buttons Use this button to adjust the image size up to 400%. To change the position of the magnified screen, press one of the LM buttons to recall the magnifying glass, then use the LM buttons to move the screen. 8. Volume + - Buttons Press + button to increase the volume and - button to decrease it. 9. ASPECT Button Press this button to select the screen size. 10. Mute Button This button turns off an image and sound for a short period of time. Press again to restore the image and sound. NOTE: When the menu is displayed, a press of this button mutes an image and sound without turning off the menu. 11. PICTURE Button Press this button to recall and display the screen-related menu. 12. Freeze Button This button will freeze a picture. Press again to resume motion. 13. Menu Button Displays the menu for various settings and adjustments. 14. LAMP RESET Button If the lamp has been turned on for more than 1,600 hours (Normal mode), the power to the unit will be cut off and no messages will be displayed. Press and hold down this button for 10 seconds or more while the unit is in stand-by mode to clear the lamp available time and the lamp usage time.
INPUT
2 3 4 8 9 10 14 15 16
6 7 11 12 13 17
15. LM (Select) Buttons L,M: Use these buttons to select the menu of the item you wish to adjust. , : Use these buttons to change the level of a selected menu item. A press of the button executes the selection. When the magnifying glass is displayed, these LM buttons move the magnifying glass. 16. Cancel Button Press this button to exit "Menus". Press this button to return to the previous menu without storing the current settings or adjustments when you are in the submenu or adjustment screen. 17. Enter Button Press this button to execute the selected item. When this is pressed, the adjustments and settings are saved, and the display is returned to the menu.
|
|
|
> |
|